Share |

Sunday, August 19, 2012

Play Ball Layout

Hi All! Have you all had a great summer too? Sorry I have been so neglectful! We have been running a mile a minute around here. All kinds of stuff and activities going on. I am sure it's the same with you though, right?

One of our favorite summer activities is going to the local minor league baseball team's games. The franchise is called The Salt Lake Bee's. Although we went this summer, the pictures used in the layout are actually from last year. I had already printed these pictures some time ago, but didn't know what I was going to do with them. When I pulled them out and they were black and white, inspiration struck. I used the team's colors, black and yellow.

Here is what I came up with:

All of the die cuts are created from my Cricut. See below for the cartridges used.  I used my Cricut to cut out the circles on the black cardstock. Then I took punched circles, slightly larger, and glued them from behind. 

This is my favorite part of the layout. I loved layering all the small little pieces together and then the circle cutout behind.  The different little words and phrases are from a piece of patterned paper made by My Mind's Eye. 

I don't have a Silhouette, but that didn't stop me from using my Cricut to come up with the title for the page! I used the darling font from my Cindy Loo cartridge, all in lower case and then used the negative space. Even though the font is pretty girly, I was able to make it work with the theme of the page by using the negative space. I also eliminated the holes in the letters p, a and b. For the tiny little banners, I cut them actually out from some super cute paper from My Mind's Eye. It's from the line designed by Rhonna Farrer. It was too cute not to use. 

I used the cream and black numbers from a piece of pattern paper from lily bee. I cut them out and placed them in order to represent the number of strikes or outs allotted, as well as the number of innings in the game. The other thing that I liked about this page was using my scallop border punch in a different way. I only punched a portion of each side on the top left and bottom right corners. Then I mounted a full piece of white cardstock behind, so that it showed on each corner. I added some details to tell about the time and place of the pics. 

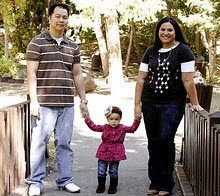
I love this picture of the three of us in our little family having a great time at one of the things we love to do every summer. 
Here are the supplies used:

Cardstock - Bazzil Basics textured black 12"x12"; Stampin' Up! Whisper White 12"x12", Basic Gray textured
Patterned Paper - Stampin' Up; Lily Bee, My Mind's Eye, Pink Paisley
Cardstock Stickers - Lily Bee (some of the pennants on left side)
Punches - Stampin' Up! Scallop Border, 1" Circle, Pennant builder
Cricut Cartridges - George and Basic Shapes (circle outline, circles on left side and full circle for journaling), Forever Young (large flourish at bottom of page and small flourish inside circle outline - both same shape), Cindy Loo (title)
Marker - Stampin' Up! Basic Black
Clear Button - Stampin' Up!
Adhesives - Stampin' Up! Dimensional foam; glue stick

Well, I am off! Hope you all are enjoying your summer! I am sad it's almost over but I am looking forward to fall.

Stay Crafty!

Saturday, May 26, 2012

World Treasures Card

Hi Everyone! Hope you are enjoying your holiday weekend! I am having a nice quiet day at home enjoying just being home.

Last week I was tasked by my Stampin' Up! upline, Cindy Petersen, to make a card with a new catalog stamp set and DSP. The stamp set is World Treasures. Although it's not the first one I will buy, I can't wait to get my hands on it, all for my own! There are so many fun possibilities for this set and even the matching DSP, International Bazaar. It's not my normal vintage feel and the colors are bright and bold, but I can't help but love them both. It makes me want to take a trip to India or somewhere far off and exotic for sure.

Here is the finished product:


I love the peacock image, don't you! It made it incredibly easy to layer. I stamped it 5 times in the five colors you see above, and layered them one on top of the other. My next favorite element of the card is the embossed background. Don't you just love it! It's such a pretty pattern. Lastly, I new I wanted to sew on the card when I realized that the current thread in my sewing machine matched the Stampin' Up! color, Lucky Limeade.

Supplies: {All Stampin' Up! except thread}

Cardstock - River Rock, Chocolate Chip, Very Vanilla, Baja Breeze
Designer Series Paper - International Bazaar {2012-2013 Catalog}
Ink - Pacific Point, Daffodil Delight, Rich Razzleberry, Pool Party, Tangerine Tango, Lucky Limeade
Stamp Set - World Treasures {2012-2013 Catalog}
Textured Impressions Embossing Folder - Fancy Fan
Framelits - Apothecary Accents {2012-2013 Catalog}
Punches - Scallop Edge Border, Itty Bitty Shapes
Jewels - Basic Rhinestones

The new catalog is amazing! You will love it. It's smaller but full of big impact. Lots and lots of vintage images, my personal favorite. The mini catalogs that are going to come out along side the big catalog will be bigger and only come out twice a year. I can't wait for you all to fall in love with it as much as I am. And guess what!!! It starts next Friday, June 1!

I am off. Stay Crafty Everyone!

Sunday, April 29, 2012

Look, I Scrapbooked!!!

Do you guys love the Miss Caroline from My Mind's Eye, as much as I do??? For me, it was love at first sight. I ended up getting a little bit of everything from all of the Miss Caroline lines. Once I got the paper, I COULD NOT WAIT TO COME HOME AND SCRAPBOOK! I have not made a page for about 6 months. And I didn't even blog the last page I made because I messed up on the journaling section.

Well, on both of the scrapbook pages I made - that's right, I made 2!!! - I made a spot to hide the journaling. So hopefully when I write down the journaling for each page, even if I don't love the way it turns out, I won't care as much because I can hide them :).

Here is the first page:

Between the photo and the doilies is where the hidden journaling panel is. Once I get it complete, I will show a post on it.

I am crazy about the wood die cuts from My Mind's Eye! I used a butterfly on this page, and a label on the next page. I wish I could die cut wood this thick, myself with my Big Shot or Cricut!
Besides the Miss Caroline paper, I also used some older My Mind's Eye lines for the banner. I thought they all went really well together.

Supplies:

Patterned Paper - My Mind's Eye Miss Caroline
Lace - Webster's Pages {cream trim}, May Arts {yellow trim}
Baker's Twine - Stampin' Up! {Island Indigo}
Thickers - American Crafts
Button's - My Mind's Eye, Stampin' Up!, Bazil Basics,
Brad - My Mind's Eye
Flowers - Prima and Stampin' Up!
Leaf Pins - Maya Road
Half Pearls - Basic Pearls Stampin' Up!
Wood Butterfly die cut - My Mind's Eye
Stamp - doily My Mind's Eye
Ink - Baja Breeze Stampin' Up!
Punches - Mini Heart, Itty Bitty Flower, Fancy Flower, 5 Petal Flower
Stampin' Up!
Doilies - Wilton
Die - Beautiful Butterflies Embosslits die Stampin' Up!

A few things to note, I didn't use any cardstock! It's all patterned paper. Also, the photo editing is from a site called PicMonkey. It's a good replacement for Picnic being gone. There are some really cool effects, and right now, all of them are free. Some day I will learn how to use my Adobe Photoshop program. Until that day comes though, this sight is great!

This next page is my favorite:


I used a combination for the Mister Huey's spritzers from Studio Calico and re-inker refills from Stampin' Up! The re-inkers created the large drops all over the page. It's a technique I will be using a lot more, for sure! My other favorite thing about the page is the banner stamps at the top of the page. These are from My Mind's Eye. Aren't they adorable! And they layer so well!

Supplies:
Cardstock - Stampin' Up! Natural
Patterned Paper - My Mind's Eye Miss Caroline
Thickers - American Crafts
Punches - Scallop border, Fancy Label, Bird Builder, Mini Flower, Itty Bitty Flower Stampin' Up!
Flourish - Cricut Cindy Loo
Die - Beautiful Butterflies Stampin' Up!
Jewels - Pearls and Rhinestones Stampin' Up!
Stamps - My Mind's Eye; Fancy Pants, Stampin' Up!
Button and Brad - My Mind's Eye
Twine - Stampin' Up!
Flower - Prima
Ribbon - Stampin' Up!
Doilies - Wilton
Ink - Baja Breeze, Daffodil Delight, Pretty In Pink, Island Indigo, River Rock stamp pads and re-inkers Stampin' Up!
Spritzers - Mister Huey's

I am off. Hope you all have a great lazy Sunday afternoon!

Stay Crafty!

Sunday, April 8, 2012

Easter Morning


Easter morning, just waiting to get the okay to head down and see what the Easter Bunny brought this morning. Also, this is Peyton's latest furry friend, Tisket {She named her Tisket-a-Tasket!}


The Easter Bunny sure was tricky this year at hiding eggs! They were in plain site, but sooo hard to find them all!

Another egg found!

And the Grand Prize!


Mom, look at all the stuff inside!


Peyton, do you know just how beautiful you are :).


Hey, Mom, my Easter basket has my name on it!


Can you see the banner hanging from the basket handle? Love this punch from Stampin' Up!!


Here is the front view of the banner from the inside of the cellophane.

Easter Basket Supplies:

Paper Doilies - Wilton {found in the cake decorating section of Walmart}
Patterned Paper - American Crafts, October Afternoon, Stampin' Up!
Cardstock - Very Vanilla from Stampin' Up!
Stamps - Easter Memories, Letter It, Mixed Bunch from Stampin' Up!
Inks - Island Indigo, Soft Suede, Lucky Limeade, Pool Party from Stampin' Up!
Brads - copper, Everyday Elegance {Sale-A-Bration - butterfly brad} from Stampin' Up
Jewels - Basic Pearls from Stampin' Up!
Punches - Fancy Label, Blossom, Petite Pennant Builder, Small Heart, Itty Bitty Flower {4 Petal) all from Stampin' Up!
Other - Dimensionals foam adhesive from Stampin' Up!
Ribbon - Offray, All My Memories
Twine - Pool Party Bakers Twine from Stampin' Up!
I love the Easter Memories stamp set that Stampin' Up! came out with last year! The silhouette shape of the little girl with the Easter basket is my favorite image from it. When Easter was approaching this year, I knew I would be getting it out to decorate Peyton's Easter basket again. {I don't think I ever took pictures of the tag from last year's Easter basket.}

This year, Peyton kept seeing all the Easter baskets when we would go shopping and kept saying that she hoped the Easter Bunny would bring her one of those. I remember when I was a kid asking for the very same thing. I didn't realize that the one my mom put together was soooo much cooler! Well, now that I am experiencing it from the perspective of a mother, it gives me a whole new appreciation for the little things my mom did for me when I was a kid :).

I don't know what it is exactly about this time of year, but I get itchy for warm weather, and at the same time, I start to focus more so on vintage furniture and vintage inspired papers and such. Nothing says more to me about vintage than the paper from October Afternoon. I can't get enough of their papers!

Now that Picnic - the free photo editing site - is going away, I am excited to have discovered a new one, Pic Monkey. It's free and just as easy to use as Picnic! All the photo's that I have uploaded today are edited using that site. I really want to get more familiar with Photo Shop so I can start learning so many of the amazing edit options out there, but there is nothing like going to a web site to do photo editing. It makes it so simple and fast.

Alright, I am off to spend the rest of this beautiful day outside in the warm sunshine! It's about time :)

Stay crafty everyone!

On The Hunt


Happy Easter everyone! Hope you are all enjoying the holiday with your family! It's finally a beautiful and warm spring day here in Salt Lake. It's been had to have both here for some reason. You would think after living here most of my life, I would be used to it. But I am really looking forward to nice warm weather again! I can't wait for it to be nice and sunny! At least 70's to 80's. That's not too much to ask, right?

Yesterday we took Peyton to the local community Easter egg hunt in Herriman. She and my nephew were sort of out of their element and intimidated by all the other kids there. So they were not completely sold on the idea of going into the middle of the designated area and just picking up candy, eggs, cotton candy, popcorn and a bunch of other things.

Lindsi, me, Peyton and OJ getting ready for the hunt!

What a ham is he!

A look of pure terror and nervousness!
And the aftermath! Peyton was too nervous to pick up anything off the ground, but a few things. Then when it was all said and done, she was sooooo upset that she only had a few things in her bucket! It's so tuff to be 4! Good thing Daddy promised to take us to get ice cream later that day!
On top of the hunt, Herriman had some little activities going on. Unfortunately it was too cold to stick around and experience all of them, so we just stayed long enough to go down the bouncy slide once, and eat a free slice of Little Caesar's Pizza Pizza!
Happy Easter everyone! Hope you have a great day! I think we are finally going to get to spend some time outside! Can't wait to get on my bike again!

Stay Crafty!

Stamp Camp

Stamp Camp was Saturday, March 31! We had 6 fun projects! 


This isn't the cupcakes we made, but we did have spring cupcakes that we stamped chickies on and colored with food coloring! So so so cute! Deanna made all the cupcakes and frosting, and then cut out the fondant with a cookie cutter. We used aqua painters and food coloring then to color in the stamped image. So easy and so much fun!
Here is Deanna's other project. How cute are these! 3 small cards and envelopes and then a box to put them in! So cute and so fun! This uses the Button Buddies stamp set, the Scallop Envelope die and  Brights Buttons. So simple and so much fun!

Sheila made this cutest card! How cute is it to pare the Everyday Enchantments paper from Sale-A-Bration and the Totally A-Mazing Stamp set from the Occasions 2012 mini catalog. 

This sucker was my project. The layers are what makes this so much fun. And it has a real vintage feel to it. It uses several layers of punched shapes, 5-Petal Flower, Fancy Flower, Large Scallop Circle, Blossom, 2 1/2" Circle. Then it's 2 Wilton paper doilies, ribbon and Labels Framelits dies. The DSP is Attic Boutique. 

Sheila also made this cutest basket! It's made of the Scallop Circle die, 5-Petal flower, circle punches, Square punch, Small Scallop Circle punch, Modern Label punch, Word Window punch, and the Dotted Scallop Ribbon punch
Here is the cute handle to the chick basket. Love the spring color sixlits inside. 

Here is what Cindy made. It's just striped straws pared with Fun Flowers die and Brights Patterns Designer Series Paper Stack. How cute would this be to tie onto a birthday present package!

Hope you all like the fun projects!
All of the supplies are from Stampin' Up!
Stay Crafty Everyone!

Sunday, April 1, 2012

Trudie's Craft Night

Hi Everyone! I know it's been a while since I have done a class of any kind, but it was a lot of fun getting my feet wet again and making some fun cards and things to show others how to make. Here is what we did at Trudie's last week:

I think I have fallen in love with this doily stamp set!

Okay, so this color combination of the Flirtatious Specialty DSP isn't my favorite. But I ended up really liking it in the end! And combined with the Delicate Doilies stamp set, its even better.

Supplies:

Cardstock - Whisper White, Wisteria Wonder, Melon Mambo, Pretty In Pink
Designer Series Paper - Flirtatious Speciality
Stamps - Delicate Doilies, Happiest Birthday Wishes {2012 hostess set}
Ink - Daffodil Delight, Pumpkin Pie {Stampin' Write Marker}, Wisteria Wonder
Punches - Modern Label, Doily Triple Layer, Itty Bitty flower, Small Heart, Scallop Ribbon border
Dies - Framelits Labels Collection
Embossing Folder - Textured Impressions Perfect Polka Dots
Brad - Pretty In Pink Subtles


A small card to say a big thanks

In order to make the flag looking tag, just take your scissors and snip the insides to make a ribbon tail. you can give the edge of paper a little fold to make it easier too. 

The fun thing about this card was the cherry scented embossing powder! I LOVE it! The smell doesn't last too long, but it does last a day or so. And it smells good when you emboss it!

Supplies: 

Cardstock - Soft Suede, Whisper White, Pumpkin Pie, Melon Mambo
Designer Series Paper - Flirtatious Specialty
Stamps - Hello, Doily, Delicate Doilies, Kindness Matters
Ink - Melon Mambo, Versa Mark pad, Soft Suede, Crumb Cake
Ribbon - Soft Suede taffeta
Punches - Curvy Label, Word Window, Scallop Trim border
Framelits Dies - Edgelits
Jewels - Basic Pearls
Embossing Powder - Cherry scented

I saved the best for last!

How cute is this sucker!!!

Shelly Schultz, a friend met through Stampin' Up, came up with this cutest sucker ever!

How cute is this whole thing! I loved Shelly's idea so much, I changed it up a bit and made it into a princess wand. Peyton gave them out to her birthday party guests. And she got one too. Hopefully, my next blog post will show you all just what I am talking about. 

Supplies:

Cardstock - Poppy Parade, Pool Party, Lucky Limeade
Designer Series Paper - Everyday Enchantment {2012 Sale-A-Bration}
Brad - Metallic 
Ribbon - 1 1/4" Striped Grosgrain, Everyday Enchantment ribbon and brad pack {2012 Sale-A-Bration}
Other - Cellophane bag
Die - Flower Folds
Punch - Modern Label
Ink - Poppy Parade

We made all these fun projects at Trudie's house last week. Next month we are planning to make a wreath! Wait till you all see it! It's so cute!!!!

Stay Crafty, everyone!

Monday, March 26, 2012

Celebrate Birthday Banner

Hi Everyone! Here's a little something I made for Peyton's birthday! Who says a Cricut and Big Shot can't work hand in hand :).


Celebrate!


Once Upon A Princess cartridge made the cute little princesses, cupcakes and presents


The font for Celebrate is from the Cindy Loo cartridge


The penants are from Maya Road


The hearts are from Stampin' Up and are the Hearts Collection Framelits Dies set for the Big Shot.

Here are the rest of the supplies:

Patterned Paper - My Mind's Eye
Cardstock - Stampin' Up!, Archivers
Paint - Plaid
Ribbon - Tulle, May Arts, American Crafts, Offray
Stamps - Tripple Treat flower Stampin' Up
Pearlies - Stampin' Up!
Embossing Folder - Textured Impressions Perfect Polka Dots for Big Shot by Stampin' Up!


Next post I will show you all the cute treat boxes! I loved how they turned out!

Hope you all are great!

Stay Crafty!

Sunday, March 18, 2012

Peyton's Birthday Party

Hi Everyone! Hope you are all good! It's been a busy busy month. I signed back up as a Stampin' Up demonstrator :), had Peyton's 4th birthday, turned 28 {for the 4th year in a row!!} and have been busy with work and play!

So I am finally getting around to posting pictures now from Peyton's birthday. My baby girl turned 4! Where does the time go!

All dressed up and ready to party!

Princess for a day and everyday!

A few of the party guests, just waiting to get their nails painted. Aren't these girls so cute!

It's Peyton's turn! She was last and so patient! Since she was the birthday girl, she even got an extra color on her flowers. 

Back at our house and ready to party!

Birthday girl and her Daddy!

Birthday morning cupcake


We had Peyton's birthday party the day before her birthday, so the next day, she was still able to do a little more celebrating. She got a birthday morning cupcake, had a few more presents to open, and then we went shopping! Malia, my niece, even came with us! It made for a great weekend!

On the next blog post, I'll show you all her fun birthday decorations and party favors! 

Stay crafty everyone!